We’ve Found a New Home!

A Vegan Kitchen has spread its wings and grown up. Finally, you can find all my new content on a very special (and very fancy, I reckon) website.

Don’t worry, you’ll still be getting an abundance of recipes, but now you will also find all my thoughts, some inspiration, and a bunch of tips and tricks that I want to share with you – because sharing is caring after all.

Head over to www.avegan-kitchen.com to see what’s going on there.

TAKE ME TO THE NEW SITE

The Humble Potato

Prepared a really yummy dinner for a group of friends last night, and while they requested the usual Beer Battered Tacos (see recipe in previous post), I decided to test out something I’ve been wanting to try for ages — and oh my goodness they were delicious.

The Smashed Potato 

Super easy to make, and super super yummy!

Small potatoes (e.g. Baby Yellow Dutch, Small Gold Yukon)

Olive oil

Rosemary

Sea Salt

2 Cloves Garlic

IMG_7496

Place potatoes in bowl and coat with oil

IMG_7500

Place poatoes and garlic cloves on lined baking tray and sprinkle generously with sea salt

IMG_7501

Poke each potato with a fork and sprinkle very generously with rosemary. Place in oven (200C) for 30 minutes

IMG_7504

Remove potatoes from the oven, press down with the back of a fork. Be careful not to press too hard too quickly or they may crumple

IMG_7507

Place in oven for a further 30 minutes (or until skin is golden brown and crispy)

IMG_7508

The result is a crispy on the outside, soft on the inside potato dish

IMG_7523

IMG_7525

IMG_7526

IMG_7528

IMG_7529

IMG_7537


Beer Batter – Enough Said

Theres not too much I can say about these tacos that will really do them justice, its really just an explosion of flavours in your mouth. It’s just a general consensus that as soon as something is ‘beer battered’ it becomes that much more delicious — and this couldn’t be more true for these tacos (which i think I’ve had every second day over this week).

I first made them for my parents who after a prolonged silence informed me that this was a dish they’d return to a restaurant for (and who doesn’t love hearing that!), I then made them for my very carnivorous friends who literally demolished them (was the perfect way to introduce them to the world of tofu).

The best part about this post is that you can use the beer batter recipe for just about anything (I’m absolutely going to be making some beer battered chips next)

Beer Batter

1 Cup Beer 

1 1/2 Cups Self Raising Flour 

1 Block Firm Tofu

Rice Bran Oil

1 Teaspoon Paprika 

1/2 Teaspoon Salt

Pour beer in to a large bowl and add the flour. Mix well until smooth. The consistency should be that of thick paint

IMG_7335

IMG_7338

Stir in paprika and salt and let the mix sit for 10 minutes

IMG_7339

While the beer batter is sitting, Cut your tofu in to .5 cm thick and 2-3 cm wide strips.

IMG_7341

Lie the tofu strips between two pieces of paper towel and apply pressure to absorb the excess liquid (this will stop the batter from going soggy)

IMG_7342

Heat a very very very generous amount of oil in to a frying pan ( super healthy, i know)

IMG_7343

Dip each strip of tofu in to the batter and coat generously

IMG_7345

Place the battered tofu in the hot oil (be really careful with the oil!) and make sure to leave space between each strip, otherwise they’ll stick together. Flip over the tofu when it is golden brown — will take a few minutes.

IMG_7346

When both sides are golden brown, remove from the oil and place on a sheet of paper towel to absorb the oil

IMG_7348

IMG_7349

Tacos

Tacos (Obviously) 

Beans 

Avocado

Rocket 

Sundried Tomatos 

Red Onion 

Coriander 

Cashew Cream (I added extra water so it was easy to drizzle)

Sriracha

I decided to make mini tacos, so if you’re wanting to make full size tacos then skip this step. Find a bowl which is approximately the size you want your taco to be (mine was about 15cm diameter), place the bowl upside down on your taco and cut around. Repeat until you have desired number of tacos.

IMG_7330

Cover eat taco with your been mix and avocado. Squeeze with a little lime juice and some salt.

IMG_7350

Place sundried tomatos down, followed by the battered tofu. Sprinkle with diced red onion, coriander, and some more lemon juice.
IMG_7352

Drizzle the cashew cream and Sriracha over the tacos generously

IMG_7385

IMG_7359

IMG_7361

IMG_7370

IMG_7373

IMG_7383

IMG_7386

IMG_7399

Homemade Oreo

I know it has been a very long time since I last blogged, but I’ve been crazy busy and unfortunately taking photos of every step is incredibly time consuming. However, with exams behind me I now have ample time to blog and get started on my e-book!

Biscuit

3/4 cup flour

1/4 cup + 2 tablespoons cocoa powder

1/4 cup + 2 tablespoons stevia (can use regular sugar)

1/4 teaspoon salt

1/4 teaspoon baking soda

1 teaspoons vanilla extract

1/4 cup coconut oil

3 tablespoons almond milk

2 tablespoons maple syrup

Filling:

1/2 cup icing sugar

1/2 teaspoon vanilla

2 tablespoon margarin

Directions

IMG_6958

Combine all dry ingredients for the biscuit in a large bowl

IMG_6959

IMG_6961

In a small bowl mix together the rest of the ingredients and add to the dry mix

IMG_6962

Knead until dough consistency, wrap in cling wrap and refrigerate for at least 30 minutes

IMG_6963

Roll the dough out between two pieces of baking paper until it is about 2-3 mm thick

IMG_6964

IMG_6965

Using a small cookie cutter, cut out circles of the dough and place on a baking tray lined with baking paper

IMG_6966

IMG_6967

Bake on 175C for 8 minutes

IMG_6968

Mix together the filling ingredients (I used my Magic Bullet) until it becomes smooth. Place about 1/4 teaspoon of mixture on every second cookie.

IMG_6969

Place second cookie over the mixture and press down gently, applying even pressure

IMG_6970

IMG_6971

IMG_6976

IMG_6977

IMG_6979

IMG_6983

IMG_6984

IMG_6986

IMG_6992

I’m Back

So I’m finally back to posting after quite a break (yay!)

Took me about an hour to decide what to have for breakfast this morning, and after careful consideration and a little surfing on the internet, I finally decided on a galette. Was a little apprehensive as i’d never made one before, but it actually turned out so delicious!!

Rosemary and Apple Galette:

Crust (inspired by Nutrionstripped.com)

½ cup of flour

½ cup coconut oil

1 Tbs. natural cane sugar

 3 tablepons cold water

2 tablespoon lemon juice

1 teaspoon coconut extract

1 teaspoon vanilla extract

Filling

2 crisp apples slice thinly

2 tablespoons maple syrup

1/2 teaspoon cinnamon

Rosemary

IMG_6703

Add all crust ingredients in to the food processor, except for the water, and pulse until combined. Slowly add the water until the ingredients come together like a dough

IMG_6704

Pour the crumb on to baking paper and roll out

IMG_6705

IMG_6706

IMG_6707


In a small bowl add the apple, maple syrup, and cinnamon in a bowl and mix until apples are coated. Lay the apple out on the dough (ensuring to leave a few cm’s around the outside to allow you to fold over). Place in the oven for 20-25 minutes on 175C or until golden

IMG_6710

When ready, remove from the oven and sprinkle with rosemary.

I enjoyed the galette with a cup of TinyTea, I’m on my fourth day and am seriously loving it!!!

IMG_6715

IMG_6732

IMG_6745


The Brownie

I’m really just going to get to the point with this post, because this brownie was so ridiculously tasty!!!

16 pitted dates

1 cup finely grated apple

2 small ripe bananas (or use 1 large)

1/2 cup maple syrup 

1/2 cup rice bran oil 

2 teaspoons vanilla extract

1 cup flour 

1 cup almond meal

1 cup unsweetened cocoa 

4 teaspoons baking powder 

1 teaspoon baking soda 

1/2 cup chopped almonds 

IMG_6549


In a food processor pulse the grated apple, dates, banana, maple syrup, and vanilla extract until really smooth


IMG_6550


Pour the mix in to a bowl and stir in the almond meal, and flour until combined


IMG_6554


Mix in the rest of the ingredients


IMG_6555


Pour the batter in to a lined baking tray and smooth the top over with a wet spatula (the photo below was taken before the top was smoothed). Bake for 25 minutes on 180C or until a cake tester comes out with a few crumbs

IMG_6559

IMG_6640

IMG_6563


IMG_6579


Kick Starting the Day


After the crazy up and down weather the Melbourne has been having, waking up to sun shinging through my window was absolutely amazing. Despite the fact that it woke me up a little earlier than I had planned on waking up, there’s something particularly exciting about starting your day with warm weather.

Not only was today’s breakfast incredibly quick and easy to make, but it is also that kind of perfect breakfast to have while sitting outside in the sun

1 1/2 cups rolled oats

3/4 cups oat flour

1/4 teaspoon cinnamon

1/4 teaspoon baking soda

1/4 cup maple syrup

1/2 cup rice bran oil

1/4 teaspoon vanilla extract

1 tablespoon falxseed

1 banana

1/2 cup chopped dark chocolate

Directions:

Start by making the oat flour. This is literally as easy as pulse some rolled oats until it becomes the consistency of flour.

IMG_6654

In a bowl combine the oats and the oat flour

IMG_6656

Stir in the rest of the ingredients

IMG_6657

IMG_6658

Roll tablespoon sized balls of mixture and place on baking sheet

IMG_6659

Press down each ball with the back of a fork

IMG_6660

Bake in oven for 7-10 on 175C

IMG_6663


I served with a spice almond smoothie bowl topped with: banana, strawberry, pomegranate, raspberry, dark chocolate, coconut, and lemon rind (the recipe for the smoothie bowl can be found in a previous post)

IMG_6667


As well as lemon, and mint infused water in my MJLSO drinking jar (yes, in case you haven’t noticed I am completely obsessed with it!)

IMG_6669

IMG_6662


Berry Crumble Tart

Today was just one of those days when the breakfast I made was exactly what I felt like! Not only is this beauty easy to make, but it’s also gluten free!!

Crust Ingredients: 

1/2 cups shredded coconut 

1 1/2 cups almond meal

2 tablespoons melted coconut oil 

1 tablespoon maple syrup 

1 tablespoon vanilla extract

IMG_6507

In a food processor (I used my Magic Bullet) combined the almond meal, coconut, melted coconut oil, vanilla extract, and maple syrup. Pulse until combined

IMG_6508

IMG_6509

Grease a pie tin and press the mixture in to the bottom and sides. Ensure you leave about 1/4 cup of the mix to put on top.

IMG_6510
IMG_6511

Bake in the oven on 175C for 10 minutes. While the pie crust is in the oven place 1 1/2 cups of frozen raspberries in a saucepan and heat until the berries are softened. Pour the berries in to the pie crust and sprinkle with the remainder of the crumb. Place in the oven for a further 5 minutes.

IMG_6512

IMG_6539

IMG_6522

IMG_6532


Served with a passionfruit, a can of Beyond Coconut Water, and some mandarin infused water in my amazing MJLSO jar!

A Sweet Saturday Morning


Last night I was reminded that a few weeks back I promised to make some vegan pancakes but never did! So, when I woke up this morning, it’s safe to say that I was incredibly excited to whip some up as, in my opinion, a fluffy stack of pancakes are the perfect satruday morning food…I mean who doesn’t want to start of their weekend on such a sweet note!

Ingredients:

1 cup flour

1 1/4 cup almond milk

2 tablespoons baking powder

1 tablespoon sugar

1 tablespoon rice bran oil

1 tablespoon finely grated apple

2 teaspoons vanilla extract

IMG_6341

In a large bowl mix together the dry ingredients

IMG_6342

Make a well in the centre, and add in the almond milk, apple, oil, and vanilla.

IMG_6343

Mix until fully combined

IMG_6344

Heat up a frying pan, and spray with oil (I used coconut oil). Pour 1/3 cup of the mix in, when the top begins to develop bubbles, flip over and cook for another 3 minutes

IMG_6345

I topped with banana, and maple syrup

IMG_6354

IMG_6358

IMG_6361

IMG_6382

IMG_6383

Served with a raspberry, and orange juice crush in my incredible new Mjlso jar! Not only is the jar incredible quality, but they come with a metal straw, and you can switch between the drinking lid and the preserving lid. You buy them at http://stores.ebay.com.au/drinking-jars-mjlso?_trksid=p2047675.l2568

IMG_6401

Winter Wonton Soup

Yay!! So ridiculously relieved that my blog is working again, and that I can get back to posting….I have so many goodies coming up for you guys!

Tonight I was feeling like dumplings, and then I kinda felt like soup – so I figured why the hell not have both. Ended up creating the most incredibly delicious dumpling filling, so much so that my sister scooped a whole heap in to a bowl and ate it as a salad. This recipe is really easy, packed with flavour, and perfect for a cold winter night (which sadly Melbourne has been experiencing a lot of)

Dumpling Ingredients: 

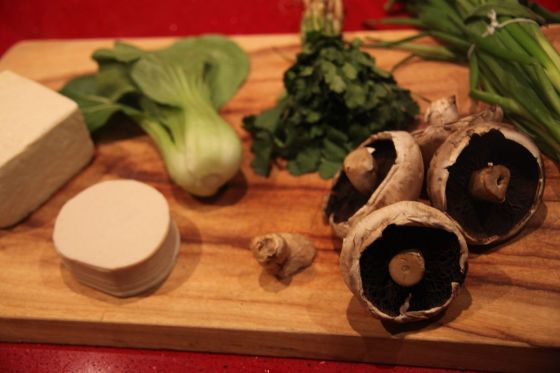
1/2 cup shredded bokchoy

1 1/2 cups chopped mushrooms (can use any mushrooms. I used portobello mushrooms as I didn’t have any exotic mushrooms left)

1 1/2 cups diced firm tofu

1/4 cup coriander

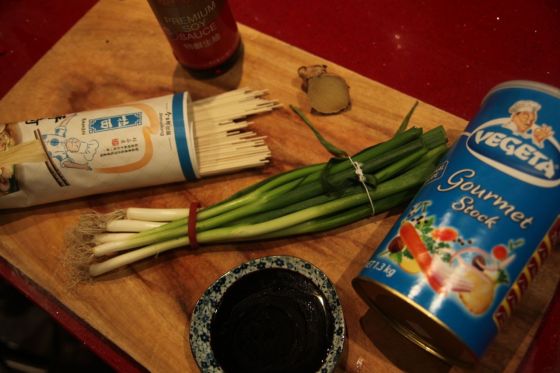
1/4 cup spring chopped spring onion

Large thumb of ginger

1/8 cup stock

1 tablespoon sesame oil

1 1/2 tablespoons soy sauce

IMG_6132

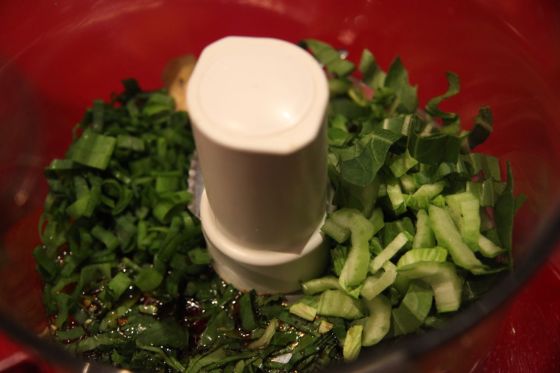
Place the bokchoy, spring onion, ginger, coriander, stock, sesame oil, and soy sauce in a food processor and pulse

IMG_6139

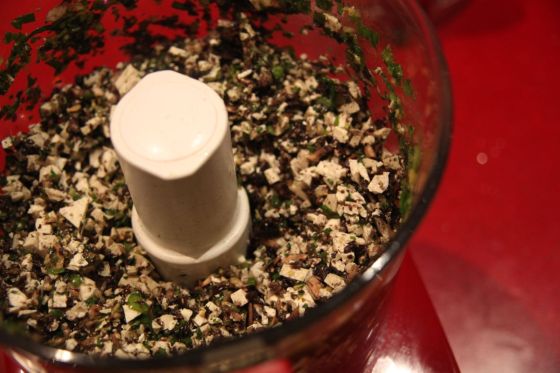
Add in the tofu, and mushrooms. Only pulse for a second or two, so that the mixture is combined, but not long enough that it has become a puree

IMG_6142

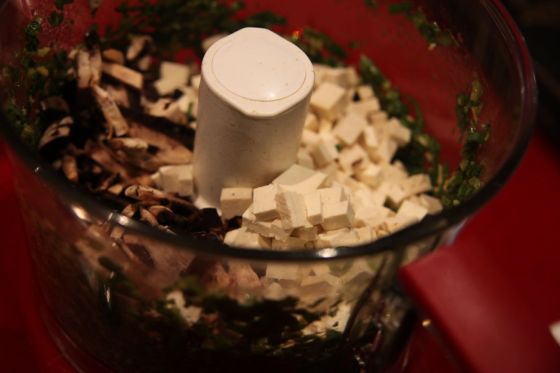
Note: You should still be able to see larger pieces of tofu, and mushroom

IMG_6144

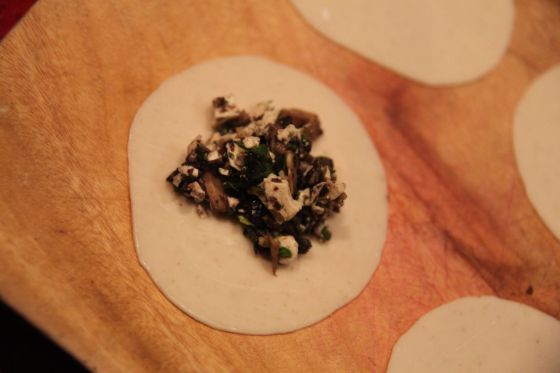
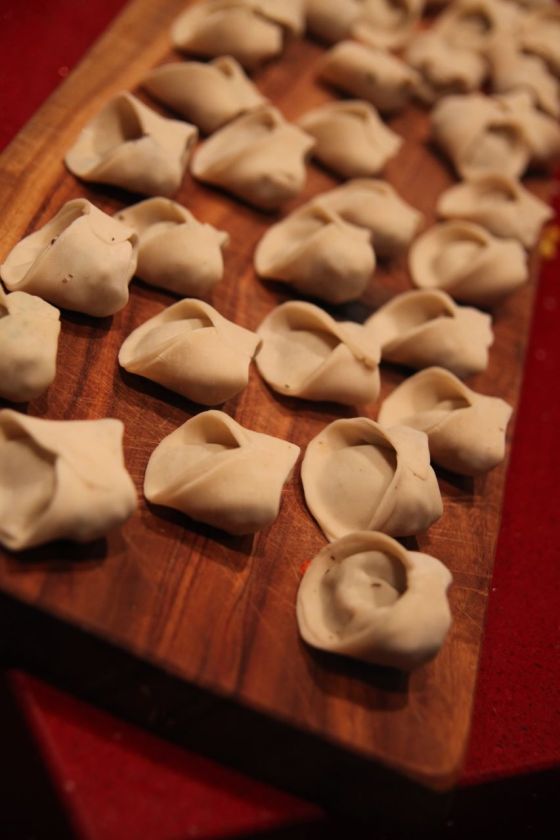
Add 1 teaspoon of the mixture in to the centre of your dumpling wrapper. Dip your finger in a small bowl of water and wet the perimeter of the wrapper

IMG_6145

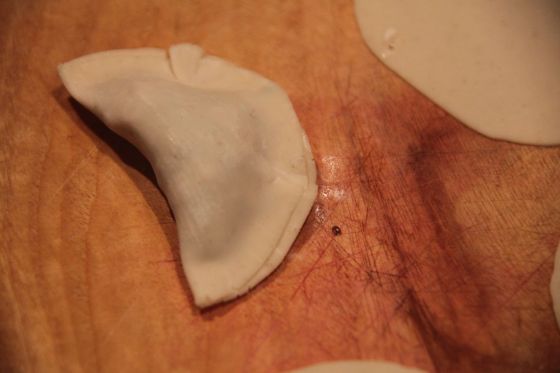
Fold the dumpling wrapper in half, and press down on the edges to ensure it is stuck down. Bring the corners of the dumpling together and press hard to join. If you’re finding that it wont stick, wet the corners and press firmly again

IMG_6146

IMG_6152

Soup Ingredients: 

10 cups of boiling water

1 brown onion

2 thumbs of ginger

3 tablespoons ABC sauce

4 teaspoons stock powder

Ramen noodles

Sriracha sauce to taste

Spring onions to taste

IMG_6154

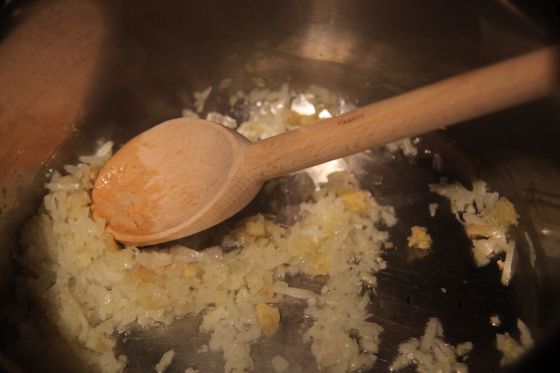
Fry the onion and ginger in a saucepan with a bit of oil

IMG_6156

Add in the rest of the ingredients. Taste the soup as you go, as these are estimates of the quantities I used, I ended up adding a bit more of each. You can also add in bokchoy, and carrot.

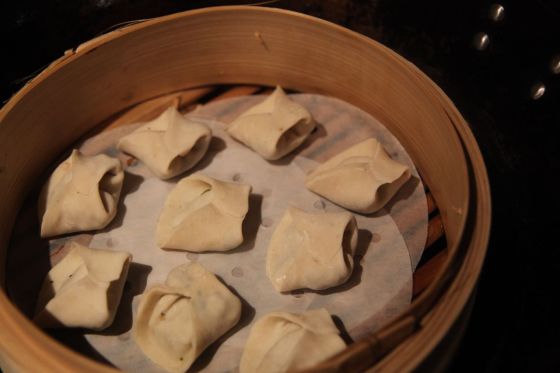
While the soup is simmering, steam you dumplings in a bamboo basket, and prepare the Ramen noodles

IMG_6161

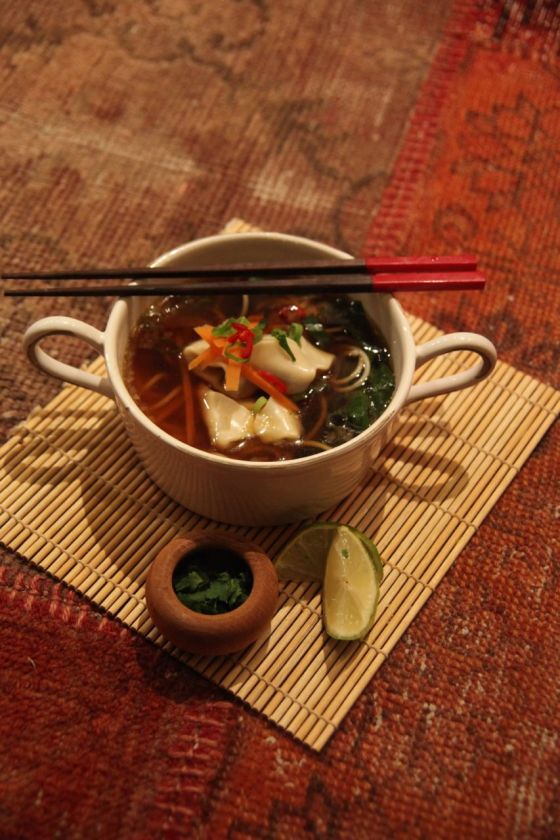
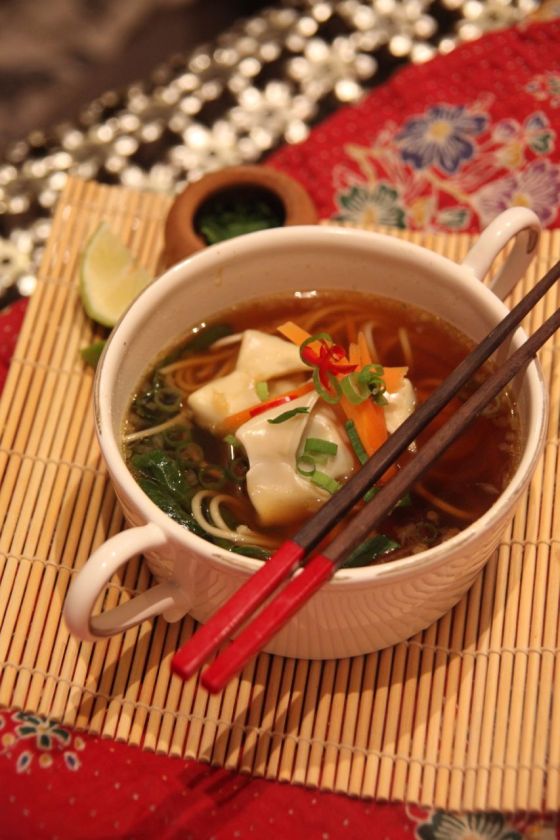
To serve place some soup in a bowl, add the bokchoy, carrot, wontons, spring onion, and a squeeze of lime

IMG_6205

IMG_6277